A Trailer for DIY Hunting
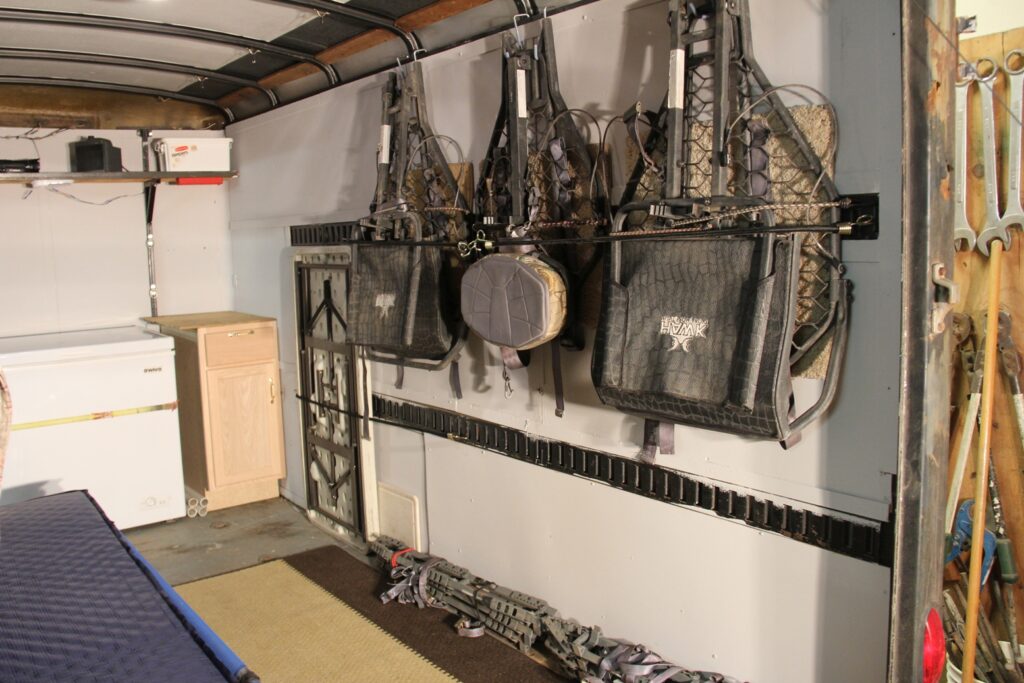
I have long thought it would be nice to have all my DIY hunting gear in one place—a trailer that would allow me to both store and haul gear. Here’s how I made one. By Bernie Barringer Returning from a DIY hunting adventure in some state far away often found me with a big mess in the back of my truck. When I left home, everything was organized, but halfway through the trip it turned into a jumble. Loading and unloading a pickup for hunting trips seemed like a never-ending string of unnecessary work. Wouldn’t it be nice to have everything organized in a trailer, then just back up to it, hook up and go? Over time I developed a plan in my mind, thinking about what I would like to have that would make my life easier when on a hunting trip. That plan came to fruition last fall when I bought a trailer, and during this winter when it became my project to convert it into a functioning hunting trailer to haul my gear and it has some additional features. First I knew I wanted to be able to butcher a deer and keep the meat in good shape for the trip home, or the trip to my next hunting destination. One of the biggest issues I have run into on past hunts was shooting a deer on the first stop of a two- or three-state hunting trip. What to do with the head, hide and meat can be a real problem. I added a small chest freezer to the trailer. Once everything is frozen, even when the freezer is unplugged it will stay frozen for about two to three days depending on the outside temperature. If you open it, cut that time by about three hours each time you open it. At other times, I found myself hunting far from a place to sleep. In western Nebraska, I came out of the woods at dark and my motel was more than an hour away. I needed to be back there well before daylight in the morning. I considered sleeping in my truck; but, at that point, the idea of having a bunk to crash in sounded much better than driving nearly three hours of the next eight. These factors weighed into my choice to build a trailer just the way I wanted it. When looking for a trailer, I knew I wanted one with a ramp door in the back rather than the swinging barn doors. I don’t take an ATV on DIY hunts often, but when I do, I wanted to be able to put it in the trailer. Plus the ramp door just makes it easier to move stuff in and out of the trailer. I finally settled on a 6-foot wide by 12-foot long trailer and bought it for $1500, about half the cost of a new one. The previous owner of the trailer used it to race go-carts. I first tore the old grubby shelving out and painted the interior an off-white color. At Menards, I bought two kitchen cabinets, one is an overhead, the other a corner cabinet. These did not have any latches on the doors or drawer, so I bought latches and installed them so they would not come open on the roadway, allowing their contents to fall out onto the floor. Each of the cabinets was installed in such a way that they were screwed to the vertical steel ribs of the trailer’s sidewall. The paneling is not strong enough to hold them. They nicely hold the accessories that I need on DIY hunts, it’s much easier than digging through totes. Next, I installed the chest freezer in the front of the trailer, using a ratchet strap to keep it in place. The trailer had lighting but it was poor, so I went to an RV dealer and picked up some new LED overhead lights. I installed one in the middle of the roof and one over the top of the freezer so it’s easy to see the contents. I installed a 12-volt Deep Cycle battery for DC power, and ran the lights to it. The lights and battery are connected to the truck’s battery when the truck is plugged into it, which keeps the deep cycle battery charged. I also installed an outlet strip which can be plugged into 110V AC power when I am parked where electricity is available. This also allows me to use a generator. I will probably install an onboard boat battery charger that will top off the battery each time it’s plugged into AC power. On the driver’s side of the trailer wall, I installed some hooks for hanging clothing, an extension cord, etc. On the other side, I installed hooks into the angle iron that runs along the top of the wall. On these I hung three treestands and fastened them with bungee cords so they do not flop around during travel. I used a square carpet remnant—usually available at no cost or low cost at any carpet store—to protect each stand and the wall from vibration. This trailer can be set up several ways. I tossed a large rug on the floor and put a cot along one wall. With a self-inflating pad and sleeping bag, this makes for a comfortable camp. I can use a small electric heater when the trailer is plugged in. If I find that I want to use propane heat in the future, I will need to add a vent of some sort, maybe a small window that I can open a little to get air circulation. The other way the trailer can be set up involves a folding table with PVC pipes to make it taller. Having it at belly-button height makes it a lot easier to work on things. This table fastens to the wall and is perfect for cutting up and wrapping a deer. Either the sleeping area or the butchering are
Bear Hunting and Bowfishing: The perfect combo hunt!
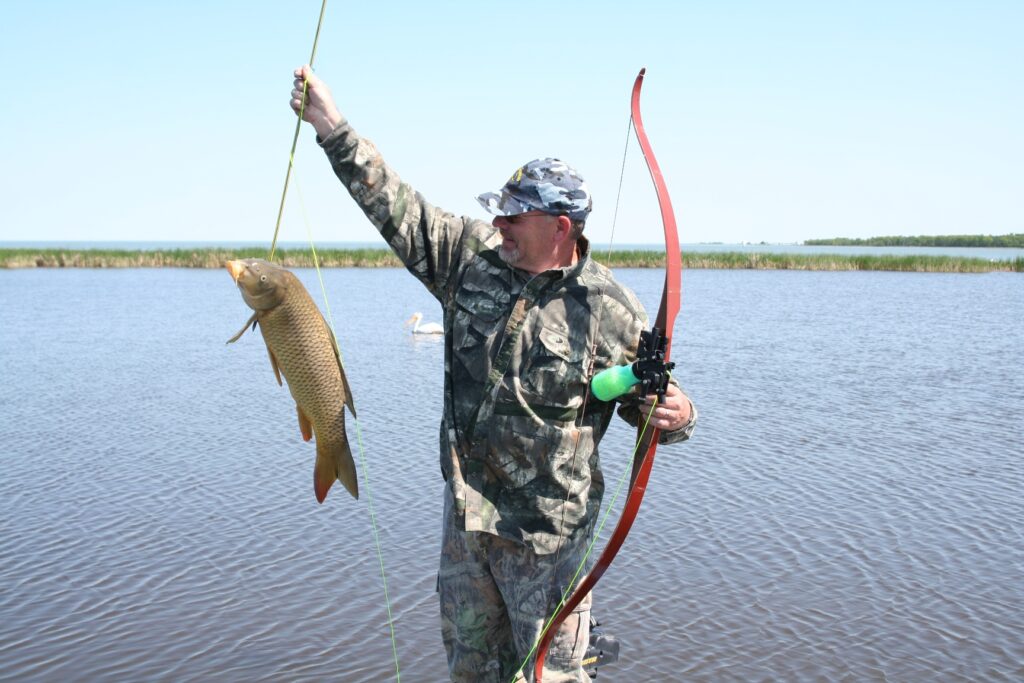
Many people like to take in some fishing on a Canadian bear hunt, but did you realize there are places you can go that offer fantastic bowfishing opportunities on a bear hunt? By Bernie Barringer Ask any bear hunting outfitter across central Canada about the most asked questions they get from prospective clients, and they will tell you that near the top of the list is the query about what to do during the day while waiting for the evening hunt. Most hunters like to fish, so that’s the number one option offered by outfitters. But there is another option available in central Manitoba. Several outfitters have been offering bowfishing combos with bear hunts as the interest in bowfishing is growing across North America. To set this up, you must first understand the terrain of Central Manitoba. It’s so flat, the saying goes that if you can’t see over something, it must be manmade. Millions of square miles of shallow lakes, swamps and lowland forest characterize this region. Lake Manitoba, for example, is 130 miles long, 30 miles wide at its widest point, and is almost entirely less than eight feet deep. It’s well known as perfect black bear habitat and dozens of outfitters fill their camps with eager bear hunters each year. But it’s also home to carp. The common carp is an invasive species imported from Europe in the early 1900s. The bottomfeeders colonized most of Manitoba’s shallow lakes and have thrived in this environment. At one time, a booming commercial fishing business centered around these carp, millions of pounds were harvested every year. But the markets for carp have waned and populations are very high. Carp are one of the most sought-after rough fish targeted by bowfishermen throughout North America. They move shallow in the spring and are vulnerable to bowfishing enthusiasts who enjoy the challenge of seeing the carp in the shallows, then sneaking within bow range either on foot or in a boat. This shallow movement just happens to coincide with the spring bear hunting season in Manitoba. I have enjoyed the amazing combination of bear hunting and carp shooting at two Manitoba outfitters and I would like to share what I have learned. The first was at Narrows Outfitters on the shores of Lake Manitoba, the second was at Bear Track Outfitters which operates out of a camp on Lake St. Martin. Narrows Outfitters takes the name from the location, the only narrow spot on 130-mile long Lake Manitoba. A bridge spans the lake at this point, and outfitter Blair Olafson’s hunting concession allows him to have bait sites on both sides of the lake. The eastern side of the lake has a large population of black bears, many of which feature the white chest blaze. The west side of the lake produces a good number of bears in colors other than black. It’s a great situation for an outfitter to be in, and of course his hunters can choose which option they prefer. Narrows Outfitters is right on the water, so my son Dawson and I took my Ranger boat along on this hunt. I had some great walleye fishing within sight of the resort, but the carp shooting was what we both remember the most fondly. We would use the boat to work our way into shallow bays and then observe carp that were working along the shoreline bulrushes and cattails. With the electric motor, we would sneak over and shoot the carp. Soon, we figured the areas where the carp were most likely to surface and just waited them out. We didn’t have to wait long, and we shot so many carp we really didn’t know what to do with them all. We put some on the bear baits and just returned some to the environment for the turtles and other organisms to feed on. We did shoot some carp from shore as well, but this hunt was best accomplished with a boat. The bear hunting package includes the use of a boat, but I would suggest bringing along an electric motor for stealth. On the hunt to Bear Track Outfitters, I had my son Sterling along. Lake St. Martin is very shallow and loaded with weeds and huge carp. But in this case, we didn’t have to go find the carp, the carp came to us. It had been a rainy spring and the lake came up a few inches, flooding roads, fields, woods, even part of the camp. (Remember how flat this land is?) We shot carp from the edges of the road, we waded fields and even shot carp that were skittering across the lawn at the resort. A boat wasn’t needed, the carp were everywhere, all we had to do was sneak around the shallows of the lake and shoot fish until our arrow tips were all destroyed. The Interlake region of Manitoba has long been home to fantastic bear hunting—we were successful in shooting a bear on both of these trips–but the carp shooting is just catching on. As bowhunting continues to grow, I suspect more outfitters who have carp shooting available to them will begin to offer these packages. In the meantime, if you like bowfishing, or would just like to try something different, combine a bear hunt with carp shooting for some of the most fun imaginable. And you will be doing a service to the area by removing some of these troublesome invasive fish. Here is a video of some of the Lake Manitoba carp shooting:
GPS Tracking Provides New Insights into Rut Movement
GPS tracking collars on 102 bucks show some interesting trends in how bucks tend to move during the breeding season. By Bernie Barringer If you are doing your homework, you are using scouting cameras and long range surveillance with binoculars to keep track of the bucks that live on the land where you hunt. You have a pretty good feel for the bucks that use the area. Then the rut comes along, the first three weeks in November, and suddenly, a buck appears on camera that you have never seen before. And just as odd, a couple of your bucks just seem to disappear. We’ve all wondered about this phenomenon, but now we have better insight than ever before. A paper recently published in a scientific journal entitled “Purposeful Wanderings: Mate Search Strategies of Male Whitetail Deer” details the findings from a five-year study of 102 bucks with GPS tracking collars. The position of the buck is recorded every hour, and the insights are quite revealing. Here are some of the findings. Some Bucks Travel Widely Deer are individuals and have individual traits or “personalities.” Some bucks are more homebodies and some travel over long distances. Interestingly, while all bucks participate in the search for does, the study found some bucks focused their efforts in specific areas, while others travelled more randomly. Younger bucks tended to travel more at random, covering a lot of ground with little pattern to their movements. Older bucks which have lived through three or more breeding seasons seemed to focus their efforts on specific areas. The scientists called these “focal areas.” It seems that bucks would direct much of their time at 3-4 four of these focal areas, and travel routinely between them. In many cases, they would visit these areas once a day. The more mature bucks tended to use their energy more efficiently in their search efforts than the younger bucks. This leads us to another conclusion we can draw from the study; bucks that are effective breeders have learned where the does spend their time. Bucks Know Where the Does Live Because no does where collared, there is no data to show that bucks and does where in the same place at the same time. However, it can be inferred from the data on the bucks’ movements, that these focal areas were areas that the does were bedding and feeding. Does tend to be in groups of half a dozen to a dozen, and they tend to feed and bed in fairly predictable places based on environmental conditions. For example, if the weather is nasty, windy and cold, the does tend to bed in lowland with thick cover. If the weather is nicer, the does tend to bed in more open areas, such as the leeward side of a ridge where they can see in front of them and smell any danger that might approach from the rear. Bucks seemed to know where the does tended to spend the majority of their time, and that’s where they focused their search efforts. The data proved that when the does were ready to breed, the bucks settled in. The Lockdown Phase At the peak of the rut, hunters have long noted that there seems to be a time when rutting activity seems to come to a screeching halt. Hunters have termed this the “lockdown phase” of the rut because of the belief that bucks and does are holed up together in breeding. The data of this study seems to validate this belief. Collared bucks that were constantly on the move suddenly stopped for 20-28 hours and remained in a small area. This corresponds with the amount of time that a doe is in peak estrus and is ready to breed. A buck that has ceased his travels for a day or so is probably in the company of the doe and breeding several times over a 25-30 hour period. Then he is on the move again. Some bucks tended to focus on one focal area. Rather than checking multiple doe areas, these bucks seemed to have found one where the does were living and just stayed there waiting for the does to come into heat, rather than running between the focal areas. Bucks Learn What Works Because more mature bucks tended to spend the majority of their time in the focal areas and the travel corridors between focal areas, it can be inferred that they have learned the behavior that makes them effective breeders. Rather than running helter-skelter, chasing every doe, and following every track that smells good, these mature bucks stick with their plan: Keep checking where the does live until they find one that’s ready to breed. Scrapes and rubs tend to show up in these breeding areas and on the travel corridors between them. Multiple mature bucks tended to use the same focal areas and travelled the terrain features between these areas. The data showed that 65 percent of the bucks visited the focal areas at least once per day. The data also suggests that bucks which learn effective breeding strategies pass on more genes, and increase their competitiveness during the breeding season. Could the specific strategies that work best in certain terrains and habitats become more prevalent over time? Of course that cannot be determined in a five-year study. How Can this Data Help the Hunter? If you are sitting in an area during the rut and you are not seeing any deer, you may want to move. There may be a lot of rutting activity going on a short distance away, but if you are not in one of the focal areas, you are missing out. Use scouting cameras and burn the boot leather to find where the does like to bed and keep that in mind when you are hunting during the rut. Be mobile. The action can be furious just over the next ridge, so use equipment that allows you to move your stand quickly and
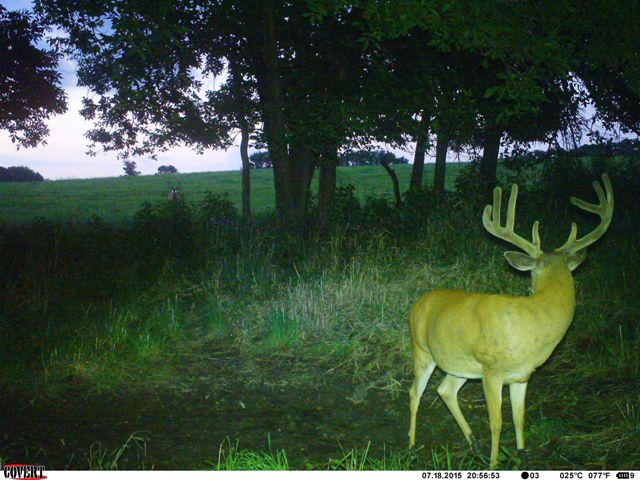
Right Place Right Time: Annual Scouting Camera Timeline
Don’t put your trail cameras away after the season! Here’s a calendar showing where your cameras should be placed throughout the year to help you learn more about the deer and increase your odds of bagging a big one next season. By Bernie Barringer Once thought of as a way monitor deer movements, thus the name “trail camera,” the use of game cameras has become a sport in and of itself. Camera users have come up with all kinds of creative ways to use the cameras to monitor wildlife activity and learn more about all kinds of animals. Yet most deer hunters still bring the cameras out before the season and store them away after the hunt is over. That can be a mistake, because the more you learn about deer year-around, the better your chances of shooting one come fall. Let’s take a look at a ways to strategically place the cameras through the year. January-April Once the hunting season is over, I move my cameras to feeding sites. The winter weather concentrates the deer in areas where there is food available. I usually have a couple sites I put out feed which allows me to get photos of the area’s deer. Otherwise, cameras can be placed on food plots and bedding areas. Trails in the snow become obvious and are easier to monitor with the cameras. Here’s another bonus to having your cameras in the woods this time of the year: You can monitor the shedding of antlers. Knowing when the bone hits the ground allows you to get out there and pick up the sheds before others get to them. I start seeing bucks without antler in numbers by the end of January, and the majority of the antlers are on the ground by the first or second week in March. May-August This is the time of the year to put your cameras on mineral sites. Most all of the deer in the area will visit sites laced with a good mineral attractant. Some will show up regularly, some only a couple times a month, but if your cameras aren’t out there you won’t get a look at the deer. I use about five pounds of mineral per application and keep it replenished each time I check the cameras, usually about twice a month. It has worked very good for me and it really helps me inventory all the bucks in my area. By the end of August, hunting season is getting close, and I start to transition some of the cameras to trails around their feeding sites. I learn which fields they are feeding in, and placing cameras on the trails will help me patter where they are moving and what times they are coming through. This information can be invaluable when hunting season opens in a few weeks. September-October By the first of September I have all my Covert cameras on trails related to the food sources. The bucks are in their bachelor groups and it’s a fun time to get lots of photos of them as their antlers become fully mature and shed their velvet the first week of September. Keep in mind that the food sources may not be the most obvious ones. The deer feeding in alfalfa and soybeans are the most visible, but there may be a lot of deer also feeding on freshly fallen acorns, hazelnuts and other mast crops. Archery season here in Minnesota opens the middle of September, and it’s hard to overstate the value of the placement of the cameras during the first half of the month. Through the second half of September and into the first half of October, the bachelor groups are breaking up and the cameras help you keep track of where the bucks are going. Trails associated with feeding patters seem to offer the best sites at this time, but by the second half of October, things will radically change. By the middle of October, scrapes and rubs are showing up throughout my hunting areas and I am moving cameras as I see the transition being made from food-focused movements to breeding focused movements. By the end of October, most all my cameras are on scrapes. I use scrape drippers to monitor the deer visits and inventory the bucks. There is no better way to get a picture of all the bucks in the area than by having a camera on a primary scrape the end of October. November By the first week in November, I put my cameras on the does. To find the bucks you must find the does, you need to know where they are bedding, where they are feeding and how they are travelling between the two areas. I have my cameras in doe bedding areas and on trails between doe bedding areas and trails leading to food sources. The first three weeks of November is peak breeding time across most of the whitetail’s range in North America. The movements of bucks will seem totally random, and in a sense, they are, but they will be looking for does. One mistake many people make during this time of the year is checking the cameras too often. You’re seeing nice bucks every time to pull the SD cards and you really want to get back in there and look at it again. However, for best results, you want to minimize intrusion into these areas so you do not change the does’ patterns and lose the information you have gained. Resist the temptation to check the cameras until you really need the info to make an informed decision on where to hunt. By the last ten days of November, the rut is winding down. At this time you should have your cameras on pinch point and travel corridors where the bucks will be moving through, looking for the last remaining does that have not been bred. Pick places that up your odds of catching one of these bucks on their feet.
Do these 6 things now to help you shoot a buck in the fall
The time to prepare your hunting property for next season’s success is in the late winter. Here are six simple land improvements steps that will increase your odds of success in the seasons to come By Bernie Barringer If you are sitting on the couch in front of a football game instead of spending a few hours improving your hunting property, you chances of success during the upcoming hunting season are not going to be as good as they could be. Winter is seen as down time for most hunters, but there are a few simple improvements you can make to your hunting property during the cold months that will pay dividends. Logging and Hinge Cutting One of the best ways to hold deer on your property is to improve the food and bedding cover areas. One of the best ways to improve both is to remove undesirable trees in order to let more sunlight to the forest floor and increase edible plants. Taking a few trees out can really help make the area more attractive to deer. Hinge cutting is done by cutting a tree at an angle about shoulder height, about ¾ of the way through. Just cut until the tree starts to fall and let it fall. The fallen tree will provide cover and browse for the deer during the winter. It also provides thermal cover, security cover for bedding, and allows more sunlight to the forest floor. Hinge cutting done right will allow the tree to continue to grow new leaves each year for at least a couple years. Improving Deer Beds One of the best ways to keep the neighbors from shooting the bucks you have been letting grow is to provide attractive bedding cover and improve actual bedding sites. A lot has been written about improving bedding cover, but not so much is known about actually creating specific deer beds. Bucks like to lie with their back against some sort of structure, just like a big old bass likes a brushpile to hide out in, deer like to get up against something that helps them feel secure. They do not like to lie down on rough ground such as rocks or sticks. You can encourage deer to lie in the beds you make by creating the perfect deer beds. Clean the sticks and rough objects out and make small “C” shaped piles of limbs, and you will be amazed at how fast the deer will begin using them. Cutting and Maintaining Trails Winter is a good time to clean up the trails you use to approach your stands and food plots. clear logs and debris from the trails and mow them if snow conditions permit. Sneaking to your stand sites can be made much easier by having a smooth clean place to walk without making too much noise or movements. If you do not have good entry trails to your stands along food plots, make them in the winter. Make them with a curve right before the plot so you can approach the field in secret. If you make a trail that goes straight to the plot and there are deer already in the plot when you approach or leave, they can see you coming. Put a bend in the trail to avoid that. Food Plot Fertlizer Winter is the time to put lime and some other fertilizers on your food plots. Have your soil sampled so you know what fertilizer you need. Have the PH checked also so you know if you are too acidic or alkali. Do the ones that can be applied in the winter which will save time in the spring and summer. Lime can be applied right on top of the snow. In the late winter right before the snow goes off you can apply clover seed. Clover seed is very small and will germinate well when spring rains and snowmelt come. This is called frost seeding and it allows the seeds to hit the ground and be ready once the temperatures are warm enough for germination. Trim Shooting Lanes The intrusion and human scent caused by trimming branches and saplings to create shooting lanes around your stands can really put deer on edge when done too close to the season or during the season. Doing it in the winter allows you to trim these out without affecting the deer movement during the hunting season. Take a pole saw and brush nippers and go to work. Don’t overtrim of course, just make sure you have a clear shot in any direction you anticipate needing one. This can be accomplished by working in pairs of course, especially if your stands are in the trees. Have one person get up in the stand and point out the limbs that need trimming. Predator Control Scientific studies have consistently shown that the more coyotes you have on your property, the lower the fawn recruitment is going to be. If you are seeing coyotes on your game cameras, or if you are seeing a significant number of mature does with only one fawn or no fawn, you probably have a predation problem. Time to take action. Coyote calling is fun and effective. It’s a great way to thin out the population and get some exercise and fresh air during the winter. Trapping and snaring coyotes is the most effective way to curb the numbers. If you don’t have the interest in catching them yourself, find a local trapper you can trust and give him a key to the gate. Most trappers will control coyotes if you also allow them to take other species such as raccoon and fox. It’s well worth the trouble to maintain a good relationship with a trapper. Get off the couch and spend some time on your hunting property this winter. You will definitely see the difference come next hunting season. Here’s a great video explaining how to do hinge cutting.